Welcome to Computer - Internet Tips

Here You Find Latest Tricks and Latest News about Facebook , Blogger , Seo , Websites , Google ,Google+ , Blogger , Website , Andriod , Hacking and many more tricks about computer or internet based Pc Security Tricks , Window Tricks . Tags : Google Tricks , Computer Tricks , Internet Tricks , Google+ tricks , Facebook Tricks , New updates , Facebook News , Google News, Hot Tricks , Twitter Tricks , Digg , Blogger Tricks , Seo Tricks , Window Tricks , Security Tips , Security Tricks , Design Blogger Or website templates , Andriod Tricks , Andriod Tips , Andriod Latest news , Apple News , technolgy Updates , News .
Showing posts with label Computer Tips. Show all posts

Convert File System From FAT32 To NTFS

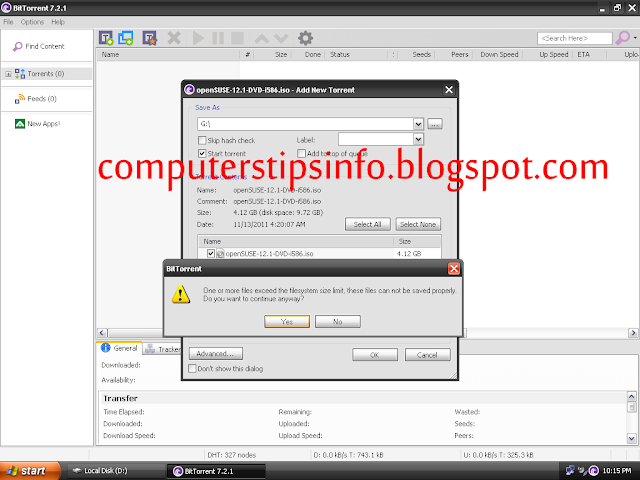
Recently when I tried to download Opensuse (Linux distro) on my pendrive through bit torrent it gave me the following error-’One or more files exceed the filesystem size limit, these files cannot be saved properly.’


FAT32 to NTFS


After searching a bit i found out that the filesystem FAT32 has max. filesize limit of 4GB and all i need to do was convert my filesystem to NTFS.

I transferred all my data from pendrive to my computer so that i can format it to NTFS, sounds simple??

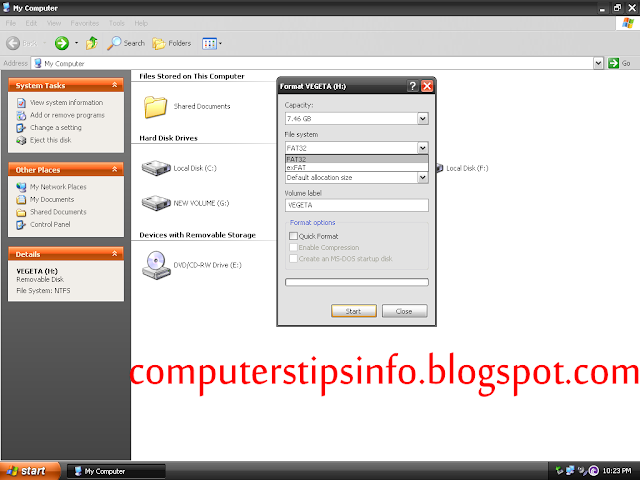
A new problem occurred.The format window didn’t have NTFS as an option in filesystem.

FAT32 To NTFS


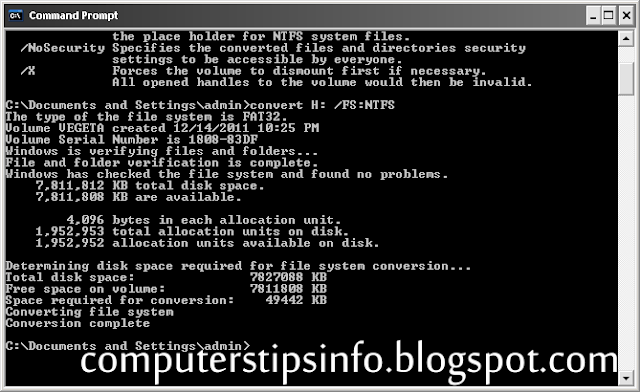
Thankfully command prompt came to my rescue.Using convert command you can not only change your filesystem but it also retains all the data on the drive Write convert/? to get all flags.

FAT32 To NTFS


syntax of the command: convert (space) [drive letter:] (space) /FS:NTFS

FAT32 To NTFS
My drive letter was H : . It took hardly a minute to convert my 8gb pen drive.


Below are few advantages of NTFS over FAT-

Security :
FAT32 provides very little security. A user with access to a drive using FAT32 has access to the files on that drive.

NTFS allows the use of NTFS Permissions. It’s much more difficult to implement, but folder and file access can be controlled individually, down to an an extreme degree if necessary.

The down side of using NTFS Permissions is the chance for error and screwing up the system is greatly magnified.Windows XP Professional supports file encryption.

Users on the network have access to shared folders no matter what disk format is being used or what version of Windows is installed.

Compatibility
NTFS volumes are not recognized by Windows 95/98/Me. This is only a concern when the system is set up for dual or multi-booting. FAT32 must be be used for any drives that must be accessed when the computer is booted from Windows 95/98 or Windows Me.

FAT and FAT32 volumes can be converted to NTFS volumes. NTFS cannot be converted to FAT32 without reformatting.

Linux can read FAT32, and with some distro’s (having kernel 2.6 or above), can also write to NTFS disks. Mac’s can read NTFS, but if you try to write to the drive, it must make changes to it which makes the file system unable to be written to on a Windows system. Mac’s can read and write to a FAT32 file system with no problem.So FAT32 is technically compatible with more systems.

Space Efficiency
NTFS supports disk quotas, allowing you to control the amount of disk usage on a per user basis.

NTFS supports file compression. FAT32 does not.

Once you pass the 8GB partition size, NTFS handles space management much more efficiently than FAT32. Cluster sizes play an important part in how much disk space is wasted storing files. NTFS provides smaller cluster sizes and less disk space waste than FAT32.

In Windows XP, the maximum partition size that can be created using FAT32 is 32GB. This increases to 16TB using NTFS.

Reliability
FAT32 drives are much more susceptible to disk errors.

NTFS volumes have the ability to recover from errors more readily than similar FAT32 volumes.

Log files are created under NTFS which can be used for automatic file system repairs.

NTFS supports dynamic cluster remapping for bad sectors and prevent them from being used in the future.

Apart from the above was my problem on filesize limit which gets increased to 16TB in NTFS as compared to 4GB in FAT32

Tips to speed up your computer

I know many of you must be tired after seeing your computer’s speed, here’s what I would suggest you to go through these simple steps to make your computer faster. They helped me in making my computer comparatively faster. So here are the steps. Do note that all these steps are for Windows computer.

1) Clean Temporary Files: Windows applications and windows itself store temporary files in dedicated temporary folder. You should empty this folder time by time. Go to start –> Run and type %temp% , Delete all files of temporary folder. Note: Some files can not be deleted if they are in use. So it’s fine even if they are there.

2) Disable Indexing: Indexing files and folder allows you to search faster, but windows uses CPU and memory for indexing. Disabling it will speed up your windows. (will decrease windows inbuilt search speed). To disable file indexing, right click the drive and choose properties from the menu. At bottom uncheck Allow indexing option and press OK.

3) Disk Cleanup: You should clean all unnecessary files with the disk. This includes windows error reports, temporary internet files etc. Right click any partition and click properties. Further click Disk Cleanup and clean files.

Tips to speed up your computer


4) Defragmentation of Harddisk: Defragment arranges all data on hard disk partition in such way that it can be fetched speedy. So data reading will be faster. So it will improve your windows performance.

In windows 7, go to start menu and type dfrgui.exe and press enter.choose partition to defrag, press analyze and defrag it later.

For older windows versions, right click my computer and choose Manage. In Disk section you will see an option to defrag.

5) Increase Page File Size: Page file is virtual RAM. Increase page file size will allow you to load huge program file in memory. Though increasing page file will help a little in speed up tasks.

In start menu right click my computer icon and choose properties.Go to advanced tab or click Advanced system settings (Vista and Windows 7).Click settings button under performance. Go to advanced tab under performance settings. Under Virtual memory section click Change button and change the values as per your requirement per drive.

6) Registry Cleanup: Junk and invalid registry keys make windows slow. A registry cleaner freeware e.g. Wise registry cleaner or shareware e.g. Tuneup utilities.

7) Disable Unnecessary Start up items: Unnecessary start up items will slow down your windows start up as well as they will slow down windows performance until they are running in background. To remove start up items, go to Start—>Run, type msconfig and press enter. Go to startup tab and check for unwanted start up programs. Uncheck them and exit all windows accepting changes.

Turn off system sounds: Why should we engage our processor in playing sounds while browsing folder or giving error when it has to do other important work ? So the last but not the least would be disabling Windows sounds. To disable windows sound go to control panel , in hardware and sound, you will find an option “change system sounds” under Sound division. Remove all sounds that are just unnecessary.

9) Use ReadyBoost: This is the most effective technique that I have come across. If you know about ready boost then it’s very good otherwise my next post would be on Ready Boost. Till then use 8 steps and feel the difference.

Hope you are able to do each one of them. If you are facing problem in any of them, reply back so that I can help you further.


Windows 7 Cool Shortcuts

You all must be very tired of using your mouse, so here are some of the very cool shortcuts using your keyboard on windows 7.


Hope you like all of them.


  • Windows + left arrow OR Windows + right arrow : Dock selected window to the left or right half of your screen.
  • Windows + up arrow OR Windows + down arrow : Maximized and restores the selected window.
  • Windows + Space-bar : Makes all open windows transparent to view gadgets and icons on desktop.
  • Windows + Home : Minimizes all but selected window. Reverse by clicking the key combination again.
  • Windows + Tab : Launch 3D representation of open windows and click Tab key again to flip through them.
  • Windows + T OR Windows + SHIFT + T : Move focus to front or back of taskbar. Press T again while holding the Windows key to cycle through items in the taskbar from left to right or, with SHIFT button held too, from right to left.
  • Windows + 1 THROUGH Windows + 9 : Launch first through ninth icon on taskbar, including items pinned to task bar.
  • Windows + SHIFT + 1 THROUGH Windows + SHIFT + 9 : Starts new instance of respective taskbar icon.
  • Windows + Ctrl + 1 THROUGH Windows + Ctrl + 9 : Cycles through multiple instances of the respective icon.
  • Windows + Alt + 1 THROUGH Windows + Alt + 9 : Opens jump list for respective icon.
  • Windows + P : Select presentation display mode.
  • Windows + G : Cycle through desktop gadgets.
  • Windows + X : Launches Windows Mobility Center. Most useful if you’re working on a laptop.
  • Windows + D : Shows or hides the desktop.
  • Windows + B : Puts focus on the ‘show hidden icons’ button on the system tray. And then by manually pressing Left or Right arrow you can select the desired one.
  • Windows + [+] OR Windows + [-] : Activates Windows Magnifier to zoom in or out of screen.
  • Windows + Esc : Exist magnifier views.
  • Ctrl + Alt + D : Switch to docked mode.
  • Ctrl + Alt + L : Switch to lense mode.
  • Ctrl + Alt + F : Switch from docked or lens mode back to full screen mode.
  • Ctrl + Alt + I : Invert colors.
  • Ctrl + Alt + Tab + left/right arrow : Flip window.
  • Alt + Tab : Cycle through open windows.


Hope all are working on your system.


For now have fun with these tricks. Will get back with more in sometime.

How to get back accidentally deleted data

You must have come across this problem of - How to get your data back which has been deleted accidentally. Hastily, you may Shift+Delete the wrong files. So here’s a small write up which tells you how you can recover your data back.


First of all whenever you delete a small or a large chunk of data, you can always do a full system restore ( if you haven’t affected the OS itself ). But a full system restore should be your last step.

So what can be done other than doing a full restore ?

Restore From Backup: You can always get your data back from the most recent backup, if you have taken some time out before to ensure your data is accessible in these kind of situation. Making full backups is very much useful since you can use them for these kind of situation.

Using Backup Software: 


There are lots of software which can be usThere are lots of software which can be used to recover your data, but the one that bitsquad suggests is Recuva for Windows. It can scan your drive for deleted files and restore them if possible. It usually backs up everything if you’d run this software not after a long time since your data is lost.


Save Redundantly: 

The above, but it’s recommended that you avoid this thing by saving important files to two different locations (preferably on two different hard drives), or by keeping a daily backup of your most important data. I know, you must be thinking that it’s impossible to backup your whole system everyday but it’ll not take too much of time and space of yours to get important once backed up.


I know most of you are lazy beings to get a backup, so most of you will be going with the 2nd way. Although there are many other software, Recuva is one of the most convenient and user friendly software which we can use to get backup of deleted files.

Hope this article will help you a lot in saving your critical files from getting deleted.


Change your Administrator Account Password from Guest Account

Everyone of you must have thought about it. How to get access to administrator account using your Guest Account.


Bitsquad is here for you to tell how you can do that.

Please Dont miss use this post.

Its meant only for helping out people who have lost their Password. So here we go.

1. Place your Windows XP CD in your cd-rom and start your computer (it’s assumed that your XP CD is bootable – as it should be – and that you have your bios set to boot from CD)

2. A message will come “Press any key to boot from cd”. Press any key.

3. Once you get in, the first screen will indicate that Setup is inspecting your system and loading files.

4. When you get to the Welcome to Setup screen, press ENTER to Setup Windows now

5. The Licensing Agreement comes next – Press F8 to accept it.

6. The next screen is the Setup screen which gives you the option to do a Repair. It should read something like “If one of the following Windows XP installations is damaged, Setup can try to repair it” Use the up and down arrow keys to select your XP installation (if you only have one, it should already be selected) and press R to begin the Repair process.

7. Let the Repair run. Setup will now check your disks and then start copying files which can take several minutes.

8. Shortly after the Copying Files stage, you will be required to reboot. (this will happen automatically – you will see a progress bar stating “Your computer will reboot in 15 seconds”

9. During the reboot, do not make the mistake of “pressing any key” to boot from the CD again! Setup will resume automatically with the standard billboard screens and you will notice Installing Windows is highlighted.

10. Keep your eye on the lower left hand side of the screen and when you see the Installing Devices progress bar, press SHIFT + F10. This is the security hole! A command console will now open up giving you the potential for wide access to your system.

11. At the prompt, type NUSRMGR.CPL and press Enter. Wohoo. You have just gained graphical access to your User Accounts in the Control Panel.

12. Now simply pick the account you need to change and remove or change your password as you prefer. If you want to log on without having to enter your new password, you can type control userpasswords2 at the prompt and choose to log on without being asked for password. After you’ve made your changes close the windows, exit the command box and continue on with the Repair (have your Product key handy).

13. Once the Repair is done, you will be able to log on with your new password (or without a password if you chose not to use one or if you chose not to be asked for a password). Your programs and personalized settings should remain intact which we have already TESTED ON SP1, And in case you are wondering, NO, you cannot cancel install after making the changes and expect to logon with your new password.

This was for windows, soon I’ll write a post telling how to do this for Linux.

Note : Softfunia is not responsible if anything goes wrong with your system after entering these commands.